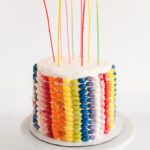
Inside: A fun and colorful jelly bean cake!
Jelly beans are at the front of my mind this time of year. They are little, sweet, and can really pack a punch when showcased in a substantial way. Covering a cake with them brings a huge burst of color onto the table.


In a simple repeating rainbow pattern, the jelly beans will make a cheery showing for any spring gathering. Covering a cake in candy is so basic, anyone can do it! No master chef skills required… so bake one up and serve a sweetly bright cake that your guests will adore this spring.


Jelly Bean Cake

Jelly Bean Cake
Ingredients
- 2 boxes cake mix
- 1 1/2 to 2 pounds assorted jelly beans
Instructions
-
For the whipped cream frosting make sure to have on hand; 2 cups heavy cream (chilled), 1/2 cups sugar, 2 teaspoons vanilla extract.
-
Make the cake following the recipe instructions. Divide batter evenly into 4 pans (we used a 6x3 round cake pans) and bake 40-45 minutes; check for doneness with a toothpick.
-
Allow the four layers of cakes to cool. Remove any domes from the tops of the cakes. For this cake, we used 3 layers and saved the 4th for snacking on later! With a sharp knife, cut each of the 3 layers evenly in half; you'll end up with 6 layers of cake.
-
While the cakes are cooling make the whipped cream frosting. Pour the cream, sugar, and vanilla into a deep bowl, or the bowl of a stand mixer attached with the balloon whisk. Whip the cream until soft peaks form, about 10 minutes. It must be stiff enough to spread. Use immediately. If the frosting begins to soften, place the bowl in the freezer for a few minutes, then whip again until soft peaks form.
-
You're ready to frost! Place a cake layer on a plate or cake stand. Put strips of parchment under this bottom layer so the frosting won't get on the plate as you frost.
-
Spread a thin layer of frosting on the first layer. Place 2nd layer directly over the first and again, spread frosting on it. Continue with the remaining 4 cake layers, applying the frosting in between each layer and on the top. Apply a crumb coating to the cake and place in the fridge to set and chill for at least a half hour.
-
Apply the final layer of frosting. Place in the fridge again to set and chill for 15-30 minutes.


Let’s get colorful
Now we’re ready to place the jelly beans on the cake! We went with a rainbow pattern for our cake; each column was one color. Decide which color to start with and grab a handful of those jelly beans.
Beginning at the top of the cake, take one jelly bean and gently press it into the side so that it stays in the frosting. Work your way down, slightly placing the jelly beans at an angle, and allowing them to touch each other. Continue with the next color/column and work your way around the cake, repeating the color pattern until the entire cake is covered.
When you’re done decorating, put the cake in the fridge until you’re ready to slice into it. Have fun and try out different colors, shapes and patterns. Creating a chevron pattern all around a cake using black and white jelly beans would be pretty. A cake in one bright, solid color will be a show stopper for a birthday celebration, and our simple rainbow design is perfect for any spring gathering.
PS. Check out this stellar rainbow jello shots for more colorful fun!
Photography and styling by Athena Plichta for A Subtle Revelry.


I thought there would be jelly beans inside, but that would surely be too messy! I love how colorful this is, and maybe not QUITE as difficult as I originally thought.
Traci, ohhhh. I’d love to put jelly beans between the layers, how fun! Although, it would make the cake a bit harder to stand up straight I would think. Fun idea:)
What fun!
Very fun, the jelly beans add great color and a bit of quirkiness.
I’m all about this. Jelly beans are the best.
I love everything about it, the colors, the fun.. yummy!
woah. It looks amazing! I don’t have any love for jellybeans though, would skittles sound/taste weird? The sourness to counter the sweet icing?
This is such a fun idea! Love all the colors. And those candles!!
I love love love this. Will definitely be trying this for Easter!!!