Mirror, mirror, on the… Wait, we all love fairytales, but this dreamy mirror glaze cake is so much better! We’ve all seen the impossibly gorgeous looks of the mirror cake trend and we’re bringing you a super simple way to make your own mirror glaze recipe for mini cakes that will wow your friends with fun disco style.
 We’ve cheated a little to create the easiest mirror glaze cake recipe and used our favorite vanilla white chocolate snack cakes, but we won’t tell if you don’t!!!

 Mini Mirror Cake

Although this cake can be created with the starting base of almost any recipe – it would be so fun to use the marshmallow creme slime party cake to create a disco party on the outside and tasty fun inside. Anyway you craft it though, this mirror glaze recipe is sure to top the cake in that perfect party style you’re after.
Mirror Glaze Cake Recipe
Use our mirror glaze recipe + a secret cheat to make the easiest mirror cake with major disco style.
Ingredients
- 12 vanilla white chocolate snack cakes
- 1 packet gelatin
- 2 1/2 tbsp cold water + 3 ½ tbl water
- 1/2 cup granulated sugar
- 1/3 cup light corn syrup
- 1/4 cup sweetened condensed milk
- 1 white chocolate baking bar you’ll need slightly less than a 4 oz bar, chopped
- gel food coloring we used peach
- petal dust optional, we used gold and hot pink
Instructions
-
Put mini cakes on a baking sheet and place in the freezer. You want your cakes to be frozen, so the glaze doesn’t just run off.
-
In a small bowl, add gelatin and 2 ½ tbl cold water and set aside to bloom.
-
In a medium saucepan, over medium heat, add 3 ½ tbl water, sugar, and corn syrup and allow to come to a boil.
-
Remove from heat and add gelatin, stirring until dissolved.
-
Next, stir in sweetened condensed milk.
-
Once the milk is combined add your chopped white chocolate and let sit for a few minutes.
-
Add your gel food coloring and gently whisk until the color is incorporated and all the chocolate has melted. You should have a nice smooth consistency once all of the chocolate has melted.
-
If there are any lumps, continue to whisk until smooth. There should be no need to strain your mixture.
-
Allow mirror glaze to cool to 90 degrees F, you can attach a candy thermometer to your saucepan to keep track. This is the absolute perfect temperature to pour your glaze. If it’s too hot, it will not adhere to your cake and if it’s too cold, it will not pour over your cakes easily.

How To Assemble The Mirror Glaze Cake
To assemble the mirror cake, remove your mini cakes from the freezer.
Place cakes on top of a small bowl, I used shot glasses. You want the base of the bowl to be smaller than your cakes, so the glaze pours off properly.
Pour your mirror glaze recipe into a pitcher or measuring cup with a lip and pour over each cake, making sure all sides of the cakes have been covered. Once all your cakes have been generously covered in mirror glaze, place them back in the fridge to set, about an hour.

To finish off the mirror cake, remove from the fridge and gently slide cake off with a palette knife and place on mini cake boards. Careful, at this stage they are super sticky, avoid touching with your fingers as much as possible and be gentle when moving them around.
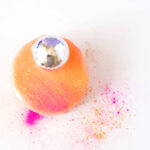
Dip a food only paint brush in petal dust, we used gold and hot pink, and gently tap over your the mirror glaze for a fancy splatter finish.
These cakes turn out so cute and can be customized for any event. Your friends will think you spent hours making them and they’ll never know how easy it was to tackle a mirror glaze cake!!!
To make mini mirror cakes with multiple colors, separate your white glaze into several small bowls and color with desired gel food colors. Pour your first color to cover your cake and continue adding additional colors until you get the effect you’re looking for. You can also use any flavor or shape of your favorite snack cakes, just make sure it’s one with a smooth coating, like chocolate.
(Project recipe, styling, and photography @A Subtle Revelry by Brandi Van Leer.)